My Christmas Card Set for 2016

Hello,

Today I want to share with you the set of cards & envelopes that I will be sending out to my friends for this year’s Christmas. I finally managed to find a layout that I like and that I enjoy recreating. The set includes a card, a gift card holder and a personalized envelope. I was pretty excited with this project and I really love how it came out.dsc_0073

I started by stamping a gingham background onto some white paper panels and I’ve used different colors of inks, just to make it all more fun and also to use more of my supplies. Being cards that I will send out I wanted to use as many supplies as I could and turn everything into a special and unique gift. Next I gold embossed the reindeer from a Winnie & Walter stamp set onto a piece of vellum and used a scalloped circle die to cut them out. I also die cut some regular circles to be smaller than the scalloped ones and I just adhered them one on top of the other.

dsc_0094

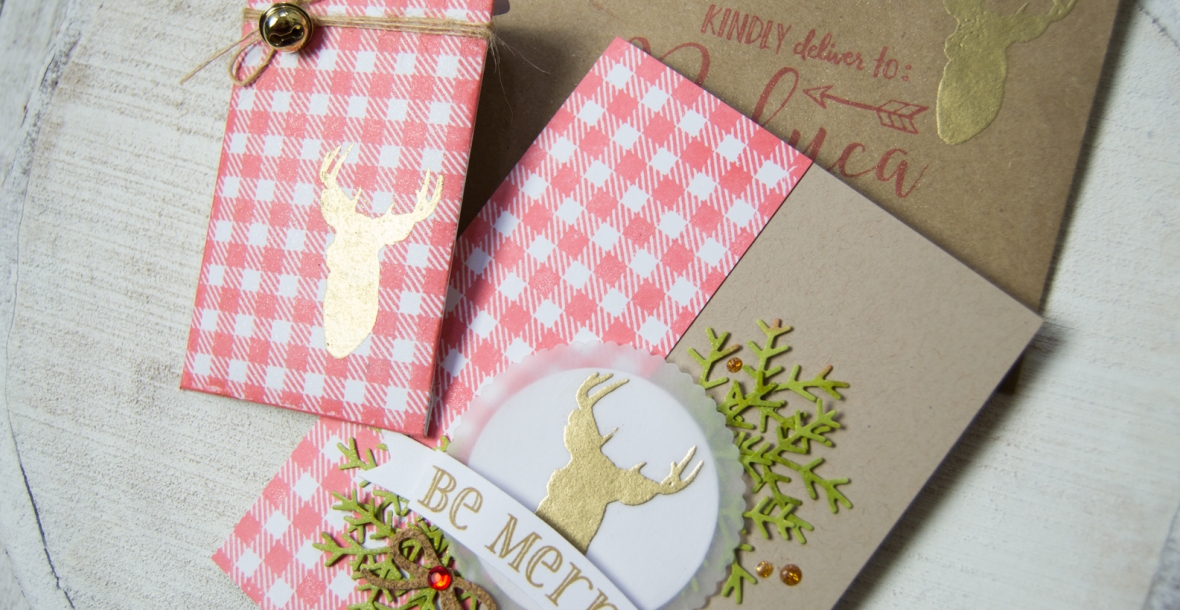
To give my cards a more winter feel I used a branch die from Memory Box and die cut a bunch of them from white cardstock. To color them in I just scrubbed my ink pad on top and once all were colored, they seemed just so real:) This is the only branch die that I have and I absolutely love the design!

For the greetings I stamped the Be Merry in brown ink and used a banner die to cut them all out.

For my gift card holders I used a die from Simon Says Stamp. This is a wonderful die to have as it works great all year round and it is perfect for any occasion. To match them with my cards I stamped the gingham pattern on the front and gold embossed that reindeer once again. I love how the gold embossing stands out on the gingham pattern, it feels so much like Christmas:)

dsc_0087

To finish off my project I decorated the kraft envelopes by doing some more stamping and personalized them with the names of the recipients by using the Concord & 9th alphabet stamps.

dsc_0080

I also created a video for you if you want to check it out; you can watch it down below or HERE on my YouTube channel. I am entering my cards in the Simon Says Stamp Monday Challenge!

I hope this was inspiring and will see you soon with a new project!

https://static.inlinkz.com/ppr.js

Merry Christmas Card ft Nuvo Mousse

Happy Friday, my friends!

I want to start of by apologizing for not being more active here on my blog, life just got crazy over the past weeks and my plans for this year’s Christmas cards videos & posts got all messed up. But today I managed to sit at my craft table and make a card. Yay!

As the title says, I am featuring once again the NUVO Mousse, a product that I absolutely love and enjoy using for my cards. This product is a very soft & shimmery paste that can be used for adding color onto die cuts, stenciling, adding splatters and so much more!

dsc_0041

I started my card by die cutting the poinsettia flowers and the lovely bird using the dies from Simon Says Stamp. For my bird I used my glue and white glitter to give it a bit of sparkle and for my flowers I used the NUVO mousse to color them all in. I just used my finger to pick the paste and rub it on top of the die cuts. Coloring with the NUVO mousse is for sure the fastest way to add color onto die cuts, lol. Being a soft paste, the color blends out so easily and that shimmer makes everything just perfect for the festive season.

dsc_0056

For my card base I did some stenciling using the negative left over that I had after cutting the poinsettias. I just placed it on top of my card and once again used my finger to add the color. The result was so beautiful, the color is subtle and elegant. I love it!

dsc_0037

Next I glued the bird on the front of my card and created a cluster with all my colored flowers. I also created a banner from some vellum for my sentiment and tucked it behind the petals of the flowers to hide the marks from the glue. To finish all up, I added several clear sequins and my card was all done.

20161111_155122

I also created a video for this card and you can find all the supplies used at the bottom of the post. You can also watch the video on YouTube HERE.

Thank you all so much for stopping by and I hope to see you all very soon!

https://static.inlinkz.com/ppr.js

Shimmer & Shine ft NUVO Mousse

Hello!

Today will be all about shimmer and sparkle and I am sharing a winter themed card as long with some new products that I recently got and already love so much:))

First thing’s first, I started working on a watercolor cardstock panel and used my Mission Gold watercolors once again. I have to say that from all the watercoloring mediums that I have, these paints are my favorites; love the vibrance that they have, how they blend with eachother, the flow and everything! Best investment I’ve ever made:)

dsc_0182

Once the paints were dry, I used an embossing folder (forgot how lovely these are) to add some dimension and interest to my background. The design of this embossing folder is simply gorgeous. Unfortunately it is discontinued, but you can achieve the same effect with any embossing folder that you have and customize your card for any season or occasion!

dsc_0196

The products that I am featuring today are the NUVO Embellishment Mousse, a paste that is so creamy and shimmery and works great for adding hihglights on your project. I just used my finger to rub the paste on top of the raised areas that I got after embossing and made a mix of gold and silver pastes. The shimmer is gorgeous! They also apply easily as the paste is soft and they kind of remind me of the texture that the creamy blush you put on your cheeks has:)

dsc_0180

Next I die cut some snowflakes from white cardstock and because I wanted to have all festive and sparkly, I covered them with glue and then poured clear glitter on top. For my sentiment I heat embossed in gold the Be Joyful from the SSS Big Scripty Holidays Stamp Set. To finish my card, I added several clear sequins here and there.

You can watch the making process in the video below or click HERE if you want to see it on my Youtube channel.

I am entering my card in the Simon Says Stamp Wednesday Challenge. This time is Anything Goes! ♥

Supplies used:

https://static.inlinkz.com/ppr.js

Christmas Holiday Card Day 10 / Foiling

Hello, everybody!

I know it’s been a while since my last post, I just had a lot of stuff to take care off that occupied most of my free time:) But I am back with the 10th and last card for my Christmas cards mini series.

And today I am sharing something new, and that’s foiling. Yay! I got the Heidi Swapp Minc Machine in the mini format like a month ago and this was the second time using it. Yep, it’s that ”spare time” again, messing with my life, hihi!

20151123_102444

As you probably already know, to do the foiling you need a foiling machine or a laminator, some heat reactive foil and also some laser printed papers. Although I have a laser printer (still in the box, btw) I got myself some ready printed papers from Heidi Swapp and used those for the foiling. The set I got is a 12 x 12 paper pad and it has all these beautiful printed papers in black that are meant to work with the Minc. So after trimming down some of the papers I ran the pieces through the Minc and just in a couple of seconds I got these gorgeous gold foiled panels that I used to decorate my card.

20151120_154007

Next I used a word die by Lawn Fawn and cut the sentiment from red cardstock. I also stamped and white embossed the second part of the greeting onto a thin strip of black cardstock. I adhered my foiled panels with craft foam for a bit of dimension, added the sentiments and also some felt decorations. Last thing, I glued several sequins here and there and my cards were all done. I made 3 cards all the same in probably 15 minutes. Heaven! 🙂

**I’m entering my card in the Jennifer McGuire’s Share Handmade Kindness challenge and the Simon Says Stamp Wednesday Challenge where is all about Christmas:)

20151123_102504

You can watch the how-to video right below or HERE on my Youtube channel.

Thx so much for your patience and for visiting me each time I put up a new post!

Christmas Holiday Cards Day 2 / ZIG & Distress Ink

Hi!

For today’s card I did a lot of coloring and had a lot of fun! I so liked the finished card that I made 2 and I would have kept going making other more:)

I love everyhting about this card, starting with the stamp! Oh my, this reindeer is just so cute. This was my first time ever trying this brand called Crafter’s Companion, and in fact the stamps are unmounted, I had no idea so it was a surprise, but the set is just so so cute that I will get myself some mount rubber and store these stamps nicely!

20151026_155156

I stamped and clear embossed the reindeer so I could protect my image from all the coloring of the background. To color this cutie I used my ZIG markers. I tend to use these much more lately and I’m glad about that as I usually tend to forget the things I have, lol:) For his body I used 060 and 070For the scarf and hat 022 and 060. And for the mantle 043 and 046

20151026_155221

The next thing I love about this card is the background. I just wet down the paper and then added my distress inks, went back and forth and did some drying inbetween, I just let myself go and didn’t stressed too much. And how those colors blended to me it was amazing:) I also added some drops of water and white paint for more interest. And probably the most fun part was when I started adding the finishing touches, the white gel pen here and there, glossy accents to the hat and lights, shimmer and sequins. I just had a blast making this card:)

20151026_155226

You can watch the how-to video rigth below or HERE on my Youtube channel

I’m entering my card in the 30 Day Color Challenge over at The Daily Marker . There are such awesome projects everyday, so much to learn from!:) I also added this card to the Simon Says Stamp Monday Challenge called Throwback and I chose the challenge Wonderful Watercolor

http://static.inlinkz.com/ppr.js

‘Stretch’ for Christmas Day 2

Hello,

I already had this made yesterday, but before I got to make the photos it was already dark outside:)

So here is the second card of the ”no-Christmas stamps” series. I believe that with the right color combination and some embellishments like glitter or embossing powders, you can create a real festive card, without the use of specific stamps.

20141121_11531420141121_115324

All flower stamps and die cuts are from Clearly Besotted. I will put the link of all supplies at the end of the post.

This is such a great stamp set that has 2 coordinated dies. The stamp set contains solid stamps aswell as build-on stamps. So you can stamp the big flower in one color only, or use the other stamps to create the different parts of the flower in various colors. There is a stamp for the leaves, a stamp for the petals and one for the stems.

To stamp the big leaves I used Versamark and then I heat embossed with golden embossing powder.

As the Clearly Besotted dies are full metal dies, and not outline dies, you have to die cut the image first and then stamp it with the coordinated stamp.

I used a piece of acetate to add more interest to my card and with the help of double-sided adhesive tape I created the 2 glittery strips. I added a couple of rhinestones here and there and heat embossed the sentiment onto some blue cardstock.

I chosoed this color combination to enter a lovely challenge from Outlawz, which proposed the colors of the South Africa national flag. I replaced the yellow with the gold, but I think that this still qualifies, right?:)

For the flowers, I tried different ways to color them, like the Prisma pencils, Copics, the Distress markers, but didn’t like how they all come out. So in the end I choosed to directly color the stamps with the Distress markers and then stamp the image.

I used reds and greens to give the look of a poinsettia, and I really like the final result. Would love to see what you think and how you use your non-Christmas stamps to create a Christmas card. You can put links to your projects in the comments below, I would love to see your beautiful work:)

List of supplies : Clearly Besotted Fabulous Fuchsias Branch Die